This is the multi-page printable view of this section. Click here to print.
Features
- 1: How to Use Smart Playlists in Navidrome (Beta)
- 2: Multi-Library Support
- 3: Jukebox mode
- 4: Sharing
- 5: Scrobbling
1 - How to Use Smart Playlists in Navidrome (Beta)
Smart Playlists in Navidrome offer a dynamic way to organize and enjoy your music collection. They are created using
JSON objects stored in files with a .nsp extension. These playlists are automatically updated based on specified
criteria, providing a personalized and evolving music experience.
Beta Feature
Smart Playlists are currently in beta and may have some limitations. Please report any issues or suggestions to the Navidrome GitHub issues page.Creating Smart Playlists
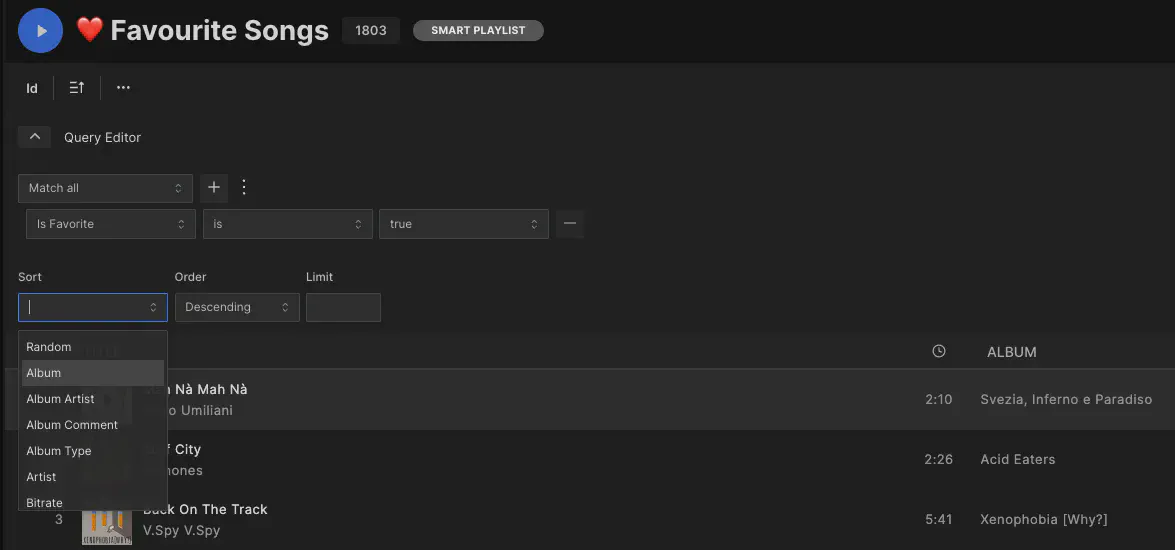
To create a Smart Playlist, you need to define a JSON object with specific fields
and operators that describe the criteria for selecting tracks. The JSON object is stored in a .nsp file
Here are some examples to get you started:
Example 1: Recently Played Tracks
This playlist includes tracks played in the last 30 days, sorted by the most recently played.
{
  "name": "Recently Played",
  "comment": "Recently played tracks",
  "all": [{ "inTheLast": { "lastPlayed": 30 } }],
  "sort": "lastPlayed",
  "order": "desc",
  "limit": 100
}
Example 2: 80’s Top Songs
This playlist features top-rated songs from the 1980s.
{
  "all": [
    { "any": [{ "is": { "loved": true } }, { "gt": { "rating": 3 } }] },
    { "inTheRange": { "year": [1981, 1990] } }
  ],
  "sort": "year",
  "order": "desc",
  "limit": 25
}
Example 3: Favourites
This playlist includes all loved tracks, sorted by the date they were loved.
{
  "all": [{ "is": { "loved": true } }],
  "sort": "dateLoved",
  "order": "desc",
  "limit": 500
}
Example 4: All Songs in Random Order
This playlist includes all songs in a random order. Note: This is not recommended for large libraries.
{
  "all": [{ "gt": { "playCount": -1 } }],
  "sort": "random"
  // limit: 1000 // Uncomment this line to limit the number of songs
}
Example 5: Multi-Field Sorting
This playlist demonstrates multiple sort fields - songs from the 2000s, sorted by year (descending), then by rating (descending), then by title (ascending).
{
  "name": "2000s Hits by Year and Rating",
  "all": [{ "inTheRange": { "year": [2000, 2009] } }],
  "sort": "-year,-rating,title",
  "limit": 200
}
Example 6: Library-Specific Playlist
This playlist includes only high-rated songs from a specific library (useful in multi-library setups).
{
  "name": "High-Rated Songs from Library 2",
  "all": [{ "is": { "library_id": 2 } }, { "gt": { "rating": 4 } }],
  "sort": "-rating,title",
  "limit": 100
}
Creating Smart Playlists using the UI
Currently Smart Playlists can only be created by manually editing .nsp files. We plan to add a UI for creating and
editing Smart Playlists in future releases.
In the meantime, if you want a graphical way to create playlists, you can use Feishin, a desktop/web client for Navidrome, that supports creating Smart Playlists:
Smart Playlists created/edited in Feishin will be available in Navidrome UI as soon as they are saved.
Importing Smart Playlists
Smart Playlists are imported the same way as regular (.m3u) playlists, during the library scan. Place your .nsp
files in any folder in your library or the path specified by the PlaylistsPath configuration. Navidrome will
automatically detect and import these playlists.
Managing Smart Playlists
Visibility and Ownership
- Visibility: To make a Smart Playlist accessible to all users, set it to ‘public’. This is crucial if you want
to use it in another
.nspfile (withinPlaylistandnotInPlaylist). - Ownership: By default, Smart Playlists are owned by the first admin user. You can change the ownership in the Playlists view to allow other users to manage them.
User-Specific Playlists
Smart Playlists based on user interactions (e.g., play count, loved tracks) are automatically updated based on
the owner’s interactions. If you want personalized playlists for each user, create separate .nsp files for each user
and assign ownership accordingly.
Refreshing Playlists
Smart Playlists are refreshed automatically when they are accessed by the UI or any Subsonic client. This ensures
that the playlist is up-to-date when you view it. To avoid unnecessary load, there is a minimum delay between refreshes.
This delay can be adjusted by setting the
SmartPlaylistRefreshDelay configuration option.
By default, this is set to 5s, meaning that Smart Playlists refreshes are spaced at least 5 seconds apart.
You can adjust this value in the configuration file.
Troubleshooting Common Issues
Playlist Not Showing Up
If a Smart Playlist is not showing up in the Navidrome UI, check the following:
- Check the logs for any errors during the library scan.
- Ensure the
.nspfile is in the correct folder and has the correct permissions. - Ensure the file is correctly formatted and does not contain any syntax errors. Tip: Use a JSON validator to check the file (ex: https://jsonlint.com/)
- Check the playlist’s visibility and ownership settings.
Referencing Other Playlists
When referencing another playlist by ID (using the operator inPlaylist), ensure that the referenced playlist is not
another Smart Playlist unless it is set to ‘public’. This ensures proper functionality.
Special Characters in Conditions
If you encounter issues with conditions like contains or endsWith, especially with special characters like
underscores (_), be aware that these might be ignored in some computations. Adjust your conditions accordingly.
Sorting by multiple fields
You can now sort by multiple fields by separating them with commas. You can also control the sort direction for each field by prefixing it with + (ascending, default) or - (descending).
Examples:
"sort": "year,title"- Sort by year first (ascending), then by title (ascending)"sort": "year,-rating"- Sort by year (ascending), then by rating (descending)"sort": "-lastplayed,title"- Sort by last played date (descending), then by title (ascending)
The global order field can still be used and will reverse the direction of all sort fields.
Deleting Users with Shared Smart Playlists
If you encounter issues deleting users with shared Smart Playlists, check if the playlists are used by other users. See this issue for details.
Editing Playlists
To change the rules of a Smart Playlist, you need to edit the .nsp file directly
(or use Feishin). Changes are automatically detected during the next library scan.
The list of tracks in a Smart Playlist is read-only and cannot be edited directly.
Additional Resources
Fields
Here’s a table of fields you can use in your Smart Playlists:
| Field | Description |
|---|---|
title |
Track title |
album |
Album name |
hascoverart |
Track has cover art |
tracknumber |
Track number |
discnumber |
Disc number |
year |
Year of release |
date |
Recording date |
originalyear |
Original year |
originaldate |
Original date |
releaseyear |
Release year |
releasedate |
Release date |
size |
File size |
compilation |
Compilation album |
dateadded |
Date added to library |
datemodified |
Date modified |
discsubtitle |
Disc subtitle |
comment |
Comment |
lyrics |
Lyrics |
sorttitle |
Sorted track title |
sortalbum |
Sorted album name |
sortartist |
Sorted artist name |
sortalbumartist |
Sorted album artist name |
albumtype |
Album type |
albumcomment |
Album comment |
catalognumber |
Catalog number |
filepath |
File path, relative to the MusicFolder |
filetype |
File type |
grouping |
Grouping |
duration |
Track duration |
bitrate |
Bitrate |
bitdepth |
Bit depth |
bpm |
Beats per minute |
channels |
Audio channels |
loved |
Track is loved |
dateloved |
Date track was loved |
lastplayed |
Date track was last played |
daterated |
Date track was lrated |
playcount |
Number of times track was played |
rating |
Track rating |
mbz_album_id |
MusicBrainz Album ID |
mbz_album_artist_id |
MusicBrainz Album Artist ID |
mbz_artist_id |
MusicBrainz Artist ID |
mbz_recording_id |
MusicBrainz Recording ID |
mbz_release_track_id |
MusicBrainz Release Track ID |
mbz_release_group_id |
MusicBrainz Release Group ID |
library_id |
Library ID (for multi-library filtering) |
Notes
- Dates must be in the format
"YYYY-MM-DD". - Booleans must not be enclosed in quotes. Example:
{ "is": { "loved": true } }. filepathis relative to your music library folder. Ensure your paths are correctly specified without the/musicprefix (or whatever value you set inMusicFolder).- Numeric fields like
library_id,year,tracknumber,discnumber,size,duration,bitrate,bitdepth,bpm,channels,playcount, andratingsupport numeric comparisons (gt,lt,inTheRange, etc.). - Multi-Library: Smart Playlists can include songs from multiple libraries if the user has access to them. Use the
library_idfield to filter songs from specific libraries.
Special Fields
random: Used for random sorting (e.g.,"sort": "random")value: Used internally for tag and role-based queries
MusicBrainz Fields
The following fields contain MusicBrainz IDs that can be used to create playlists based on specific MusicBrainz entities:
mbz_album_id: Filter by specific MusicBrainz albummbz_album_artist_id: Filter by specific MusicBrainz album artistmbz_artist_id: Filter by specific MusicBrainz artistmbz_recording_id: Filter by specific MusicBrainz recordingmbz_release_track_id: Filter by specific MusicBrainz release trackmbz_release_group_id: Filter by specific MusicBrainz release group
Any tags imported from the music files, that are not listed above, can be also used as fields in your Smart Playlists. Check the complete list of tags imported by navidrome. You can also add your own custom tags to your music files and use them in your Smart Playlists. Check the Custom Tags for more information.
Operators
Here’s a table of operators you can use in your Smart Playlists:
| Operator | Description | Argument type |
|---|---|---|
is |
Equal | String, Number, Boolean |
isNot |
Not equal | String, Number, Boolean |
gt |
Greater than | Number |
lt |
Less than | Number |
contains |
Contains | String |
notContains |
Does not contain | String |
startsWith |
Starts with | String |
endsWith |
Ends with | String |
inTheRange |
In the range (inclusive) | Array of two numbers or dates |
before |
Before | Date ("YYYY-MM-DD") |
after |
After | Date ("YYYY-MM-DD") |
inTheLast |
In the last | Number of days |
notInTheLast |
Not in the last | Number of days |
inPlaylist |
In playlist | Another playlist’s ID (see below) |
notInPlaylist |
Not in playlist | Another playlist’s ID (see below) |
The nature of the field determines the argument type. For example, year and tracknumber require a number,
while title and album require a string.
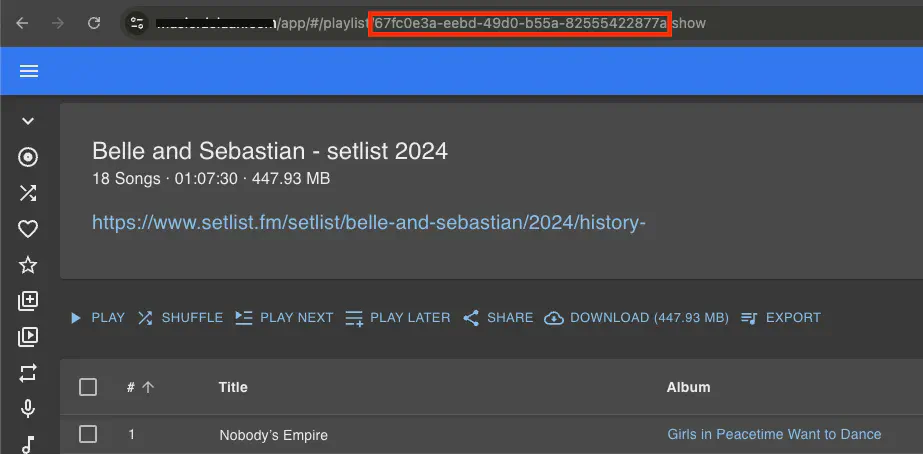
To get a playlist’s ID to be used in inPlaylist and notInPlaylist, navigate to the playlist in the Navidrome UI
and check the URL. The ID is the last part of the URL after the /playlists/ path:
2 - Multi-Library Support
Overview
Navidrome supports multiple music libraries since v0.58.0, allowing you to organize your music into separate collections with user-specific access controls. This feature is perfect for:
- Separating different types of content (music vs. audiobooks)
- Organizing by quality (lossy vs. lossless)
- Separating personal collections (family members, roommates)
- Organizing by genre or era (classical, jazz, modern)
- Managing different sources (official releases vs. bootlegs/live recordings)
How Multi-Library Works
Default Library
When Navidrome starts, it automatically creates a default library using your MusicFolder configuration. This becomes “Library 1” and all existing users automatically get access to it, ensuring backward compatibility.
User Access Control
- Admin users automatically have access to all libraries
- Regular users must be explicitly granted access to libraries by an administrator
- Users can only see and access music from libraries they have permission to use
- Each user can switch between their accessible libraries using the library selector in the UI
Data Isolation
- Albums are scoped to a single library; each library maintains its own set of albums and their songs.
- Artists can have albums and songs spread across multiple libraries. The same artist may appear in several libraries, each with different albums or tracks.
- Artist statistics and metadata are aggregated across all libraries where the artist appears.
- Playlists can contain songs from multiple libraries (if the user has access to those libraries)
- Smart playlists can be scoped to specific libraries
- Search results are filtered by the user’s accessible (and selected) libraries
Setting Up Multi-Library
Creating Additional Libraries
-
Access Library Management
- Log in as an administrator
- Go to Settings → Libraries
-
Create a New Library
- Click the "+" button to add a new library
- Provide a Name for the library (e.g., “Audiobooks”, “FLAC Collection”)
- Set the Path to the folder containing your music files
- Optionally set the library as default for new users
- Click Save
-
Initial Scan
- The new library will automatically begin scanning
- Monitor the scanning progress in the Activity Panel
- Large libraries may take time to complete the initial scan
Managing User Access
-
Assign Libraries to Users
- Go to Settings → Users
- Click on a user to edit their settings
- In the Libraries section, check the libraries the user should access
- Click Save
-
Verify Access
- Users will see a library selector in the sidebar if they have access to multiple libraries
- The library selector is displayed in the top left corner of the UI
- Users can select multiple libraries to browse and listen to their music
Configuration Considerations
File Organization
Each library should have its own root folder structure:
/music/main/           # Default library (MusicFolder)
├── Artist 1/
├── Artist 2/
└── ...

/music/audiobooks/     # Audiobooks library
├── Author 1/
├── Author 2/
└── ...

/other_path/lossless/       # High-quality library
├── Artist 1/
├── Artist 2/
└── ...
It is up to the user where to save music collections. You can store your artists in /music or any other path you want to use.
Permissions
- The Navidrome user must have read access to all library folders
- Consider using the same ownership/permissions across all library folders
- Ensure adequate disk space for each library’s cache and metadata
Performance
- Each library maintains its own file system watcher
- Multiple libraries scanning simultaneously may impact performance
- Consider staggering initial scans of large libraries
- Large numbers of libraries may affect UI performance
Using Multi-Library
Switching Libraries
- Use the library selector in the sidebar to select visible libraries
- All browsing, searching, and playback is scoped to the selected libraries
Cross-Library Features
- Playlists: Can contain songs from multiple libraries (user must have access)
- Smart Playlists: Can be scoped to specific libraries using filters
- Search: Results from all accessible libraries (filtered by permissions)
- Statistics: Maintained separately per library
API and Client Support
Subsonic API
- The
getMusicFoldersendpoint returns all libraries accessible to the authenticated user - All other endpoints respect the user’s library permissions
- Clients that support multiple music folders will work with Navidrome’s multi-library feature
Client Compatibility
Most Subsonic-compatible clients that support multiple music folders will work with Navidrome’s multi-library feature. Check your client’s documentation for music folder support.
Troubleshooting
Library Not Scanning
- Verify the path exists and is readable by the Navidrome user
- Check the logs for permission errors
- Ensure the path doesn’t overlap with other libraries
User Cannot Access Library
- Verify the user has been granted access to the library in user settings
- Check that the library has completed its initial scan
Performance Issues
- Monitor system resources during simultaneous library scans
- Consider adjusting scanner settings if experiencing high I/O
Best Practices
- Design your folder structure before creating libraries
- Use clear, descriptive names for libraries
- Consider future growth when organizing
Related Features
- Configuration Options: Basic setup and MusicFolder configuration
- Smart Playlists: Create dynamic playlists with library-specific filters
- Backup: Protecting your multi-library setup
3 - Jukebox mode
Introduction
Navidrome’s Jukebox feature is a built-in functionality that allows users to play music directly to the server’s audio hardware. This essentially turns your server into a jukebox, enabling you to play songs or playlists remotely through a supported Subsonic client. With the Jukebox feature, you can control the audio playback in real-time, just like you would with any other media player. It’s a convenient way to enjoy your music collection without the need for additional hardware or software. Ideal for parties, background music, or personal enjoyment, this feature enhances the versatility of your Navidrome server setup.
Navidrome’s Jukebox mode is based on the OpenSource audio player MPV. MPV is a mature and tested audio/videoplayer that is supported on many platforms. Navidrome’s Jukebox mode uses MPV for audio playback in combination with MPV’s feature to be controlled through IPC.
MPV Installation
MPV must be present on the system where the Navidrome server runs. You might find it already installed or could install it yourself using the methods given on the MPV’s installation page.
The minimal requirement is the IPC support. MPV added IPC support with version 0.7.0 for Linux and macOS and added Windows support with version 0.17.0. Your OS will most probably include newer versions (0.3X) which we recommend. After the installation check the version with:
$ mpv --version
Jukebox mode will use the MPV audio device naming scheme for its configuration. To get an overview about the available audio devices on the system do:
$ mpv --audio-device=help
Here is an example on macOS:
List of detected audio devices:
  'auto' (Autoselect device)
  'coreaudio/AppleGFXHDAEngineOutputDP:10001:0:{D109-7950-00005445}' (BenQ EW3270U)
  'coreaudio/AppleUSBAudioEngine:Cambridge Audio :Cambridge Audio USB Audio 1.0:0000:1' (Cambridge Audio USB 1.0 Audio Out)
  'coreaudio/BuiltInSpeakerDevice' (MacBook Pro-Lautsprecher)
or on Linux:
List of detected audio devices:
  'auto' (Autoselect device)
  'alsa' (Default (alsa))
  'alsa/jack' (JACK Audio Connection Kit)
  'alsa/default:CARD=Headphones' (bcm2835 Headphones, bcm2835 Headphones/Default Audio Device)

  ...

  'jack' (Default (jack))
  'sdl' (Default (sdl))
  'sndio' (Default (sndio))
Please use the full device name if you do not want to use MPV’s auto device. For example on macOS:
"coreaudio/AppleUSBAudioEngine:Cambridge Audio :Cambridge Audio USB Audio 1.0:0000:1"
Configuration
Jukebox mode is enabled by setting this option in your configuration file
(normally navidrome.toml):
Jukebox.Enabled = true
In most cases, this should be the only config option needed.
The MPV binary should be found automatically on the path. In case this does not work use this configuration option:
MPVPath = "/path/to/mpv"
Jukebox mode will use MPV’s auto device for playback if no device is given.
One can supply an array of multiple devices under Jukebox.Devices (note: this config option cannot be set as an environment variable):
Jukebox.Devices = [
    # "symbolic name " "device"
    [ "internal",     "coreaudio/BuiltInSpeakerDevice" ],
    [ "dac",          "coreaudio/AppleUSBAudioEngine:Cambridge Audio :Cambridge Audio USB Audio 1.0:0000:1" ]
]
and select one by using Jukebox.Default:
Jukebox.Default = "dac"
Here is one example configuration:
# Enable/Disable Jukebox mode
Jukebox.Enabled = true

# List of registered devices, syntax:
#  "symbolic name " - Symbolic name to be used in UI's
#  "device" - MPV audio device name, do mpv --audio-device=help to get a list

Jukebox.Devices = [
    # "symbolic name " "device"
    [ "internal",     "coreaudio/BuiltInSpeakerDevice" ],
    [ "dac",          "coreaudio/AppleUSBAudioEngine:Cambridge Audio :Cambridge Audio USB Audio 1.0:0000:1" ]
]

# Device to use for Jukebox mode, if there are multiple entries above.
# Using device "auto" if missing
Jukebox.Default = "dac"
The MPVCmdTemplate / Snapcast integration
There might be cases, where you want to control the call of the mpv binary. Noteable mentions would be the integration with Snapcast
for multi room audio. You can use the MPVCmdTemplate for this.
The default value is mpv --audio-device=%d --no-audio-display --pause %f --input-ipc-server=%s.
| Symbol | Meaning |
|---|---|
%s |
Path to IPC server socket |
%d |
Audio device (see above) |
%f |
Path to file to play |
To integrate with Snapcast alter the template:
MPVCmdTemplate = "mpv --no-audio-display --pause %f --input-ipc-server=%s --audio-channels=stereo --audio-samplerate=48000 --audio-format=s16 --ao=pcm --ao-pcm-file=/tmp/snapfifo"
This assumes Snapcast is running on the same machine as Navidrome. Check the Snapcast documentation for details.
Usage
Once Jukebox mode is enabled and configured, to start playing music through your servers speakers you’ll need to download a third-party Subsonic client. This client acts as a remote control. Not all Subsonic clients support Jukebox mode and you’ll need to check that your client supports this feature.
Jukebox mode is currently not supported through the Navidrome Web UI.
Troubleshooting
If Jukebox mode is enabled one should see the message “Starting playback server” in the log. The number of detected audio devices and the device chosen will be given in the log as well:
INFO[0000] Starting playback server
INFO[0000] 4 audio devices found
INFO[0000] Using default audio device: dac
For further troubleshooting, set Navidrome’s loglevel to DEBUG:
LogLevel = 'DEBUG'
4 - Sharing
NOTE
Please be aware that the Sharing feature is still under active development, and improvements to the functionality are expected in future updates. Please report any issues or suggestions to the Navidrome GitHub issues page.Navidrome has a “Sharing” feature which allows users to generate a shareable link for a track, album, artist, or playlist. This link can then be sent to friends, allowing them to listen or download the music without having an account on your Navidrome instance.
Enabling the Sharing Feature
The Sharing feature is disabled by default. To enable it, you need to adjust your Navidrome
configuration. In your configuration file, set EnableSharing=true, or set the
environment variable ND_ENABLESHARING=true.
Once the Sharing feature is enabled, all users will have access to all existing shares. This includes the ability to change the description and expiration date of the shares, as well as the capability to create new shares.
Please note that at this time, there is no way to set specific sharing permissions per user. This means that once the Sharing feature is enabled, all users have equal access and capabilities related to sharing. This includes the ability to view, modify, and create shares.
Due to this, we advise you to enable this feature only if you are comfortable with these permissions. Future updates may include more granular permission controls for sharing.
Default Expiration for Shares
By default, new shares (public links) expire after 1 year (“8760h”). You can set a different default expiration time for all new shares using the DefaultShareExpiration config option. This sets how long new shares will be valid, unless you manually change the expiration when creating the share.
Set it in your config file:
DefaultShareExpiration = "8760h" # Shares expire after 1 year by default
Or as an environment variable:
ND_DEFAULTSHAREEXPIRATION=8760h
Use values like "24h" or "1h30m". Valid suffixes are "h" (hours), "m" (minutes), and "s" (seconds).
Using the Sharing Feature
Once the Sharing feature is enabled, all users will be able to access current shares, modify descriptions and expiration, and create new ones. However, as of the initial implementation, there is currently no way to set permissions per user. When browsing your music collection, you will notice a “Share” button or menu item available for each item, be it a track, album, artist, or playlist. To share an item, simply click on this “Share” button.
Upon clicking the “Share” button, a dialog box will appear, allowing you to configure your share. This includes setting a description other configurations for the share.
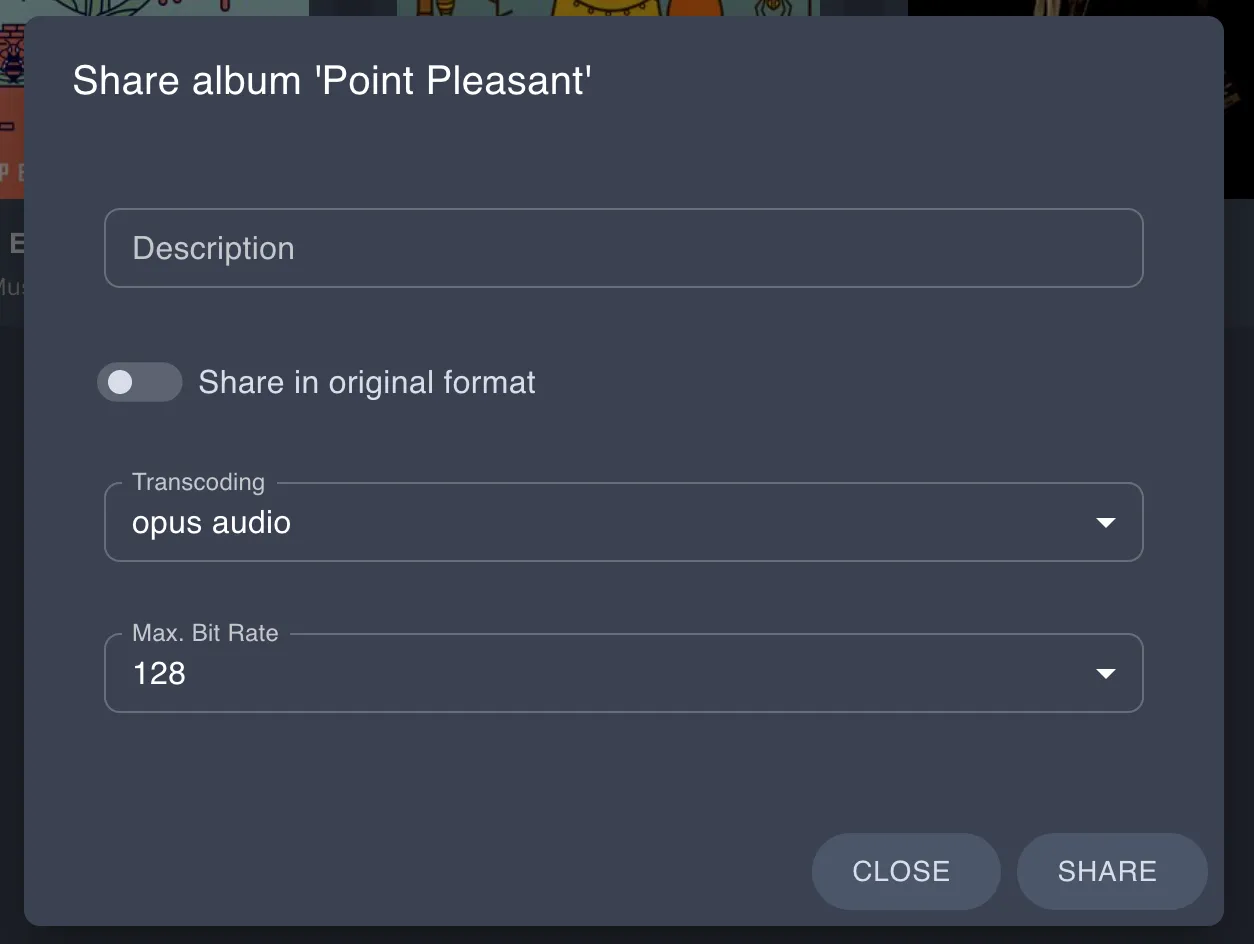
Once you have configured your share as desired, click the “Share” button. This will generate a unique shareable link, which you can then copy and share with your friends.
The generated sharable links will be in the following format: http://yourserver.com/share/XXXXXXXXXX. If you have Navidrome behind a reverse proxy, ensure you allow traffic to /share.
Subsonic API Endpoints
The Sharing feature also implements the related Subsonic API endpoints. See the API docs for implemented endpoints
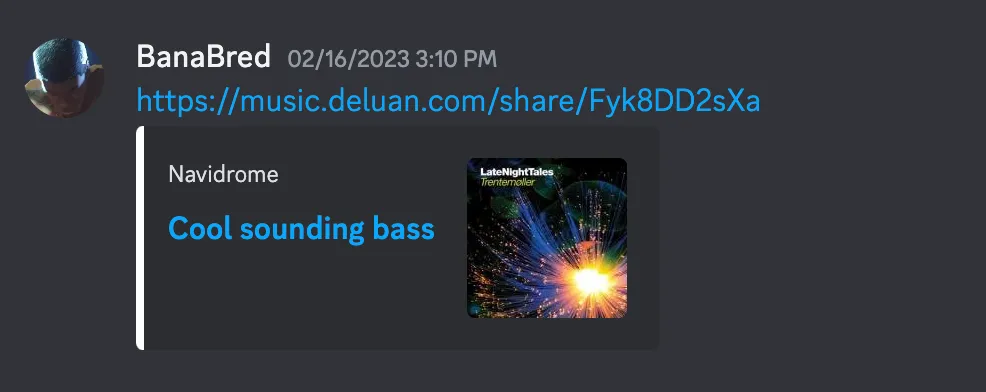
Meta-tags to HTML
Meta-tags are added to the HTML to provide some information about the shared music on chat platforms. Example of a link shared in Discord:
5 - Scrobbling
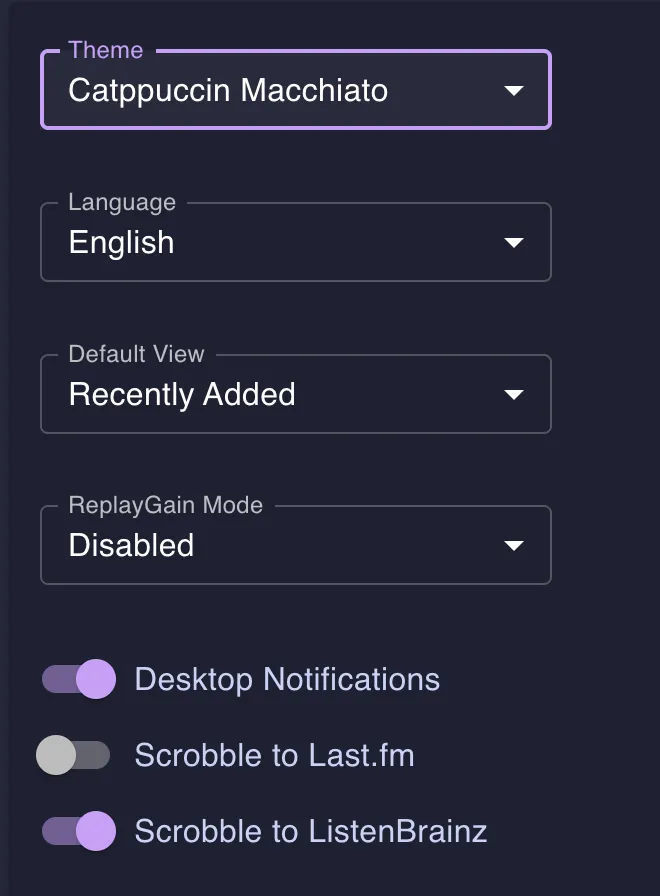
Navidrome allows you to easily scrobble your played songs to Last.fm and ListenBrainz.
Last.fm
- Ensure you have the API Key and API Secret set according to the instructions in External Integrations.
- Go to your user profile’s Personal Settings.
- Toggle the option
Scrobble to Last.fm, a new browser tab will open directing you to Last.fm.
- If you are not logged in, then log in with your Last.fm credentials.
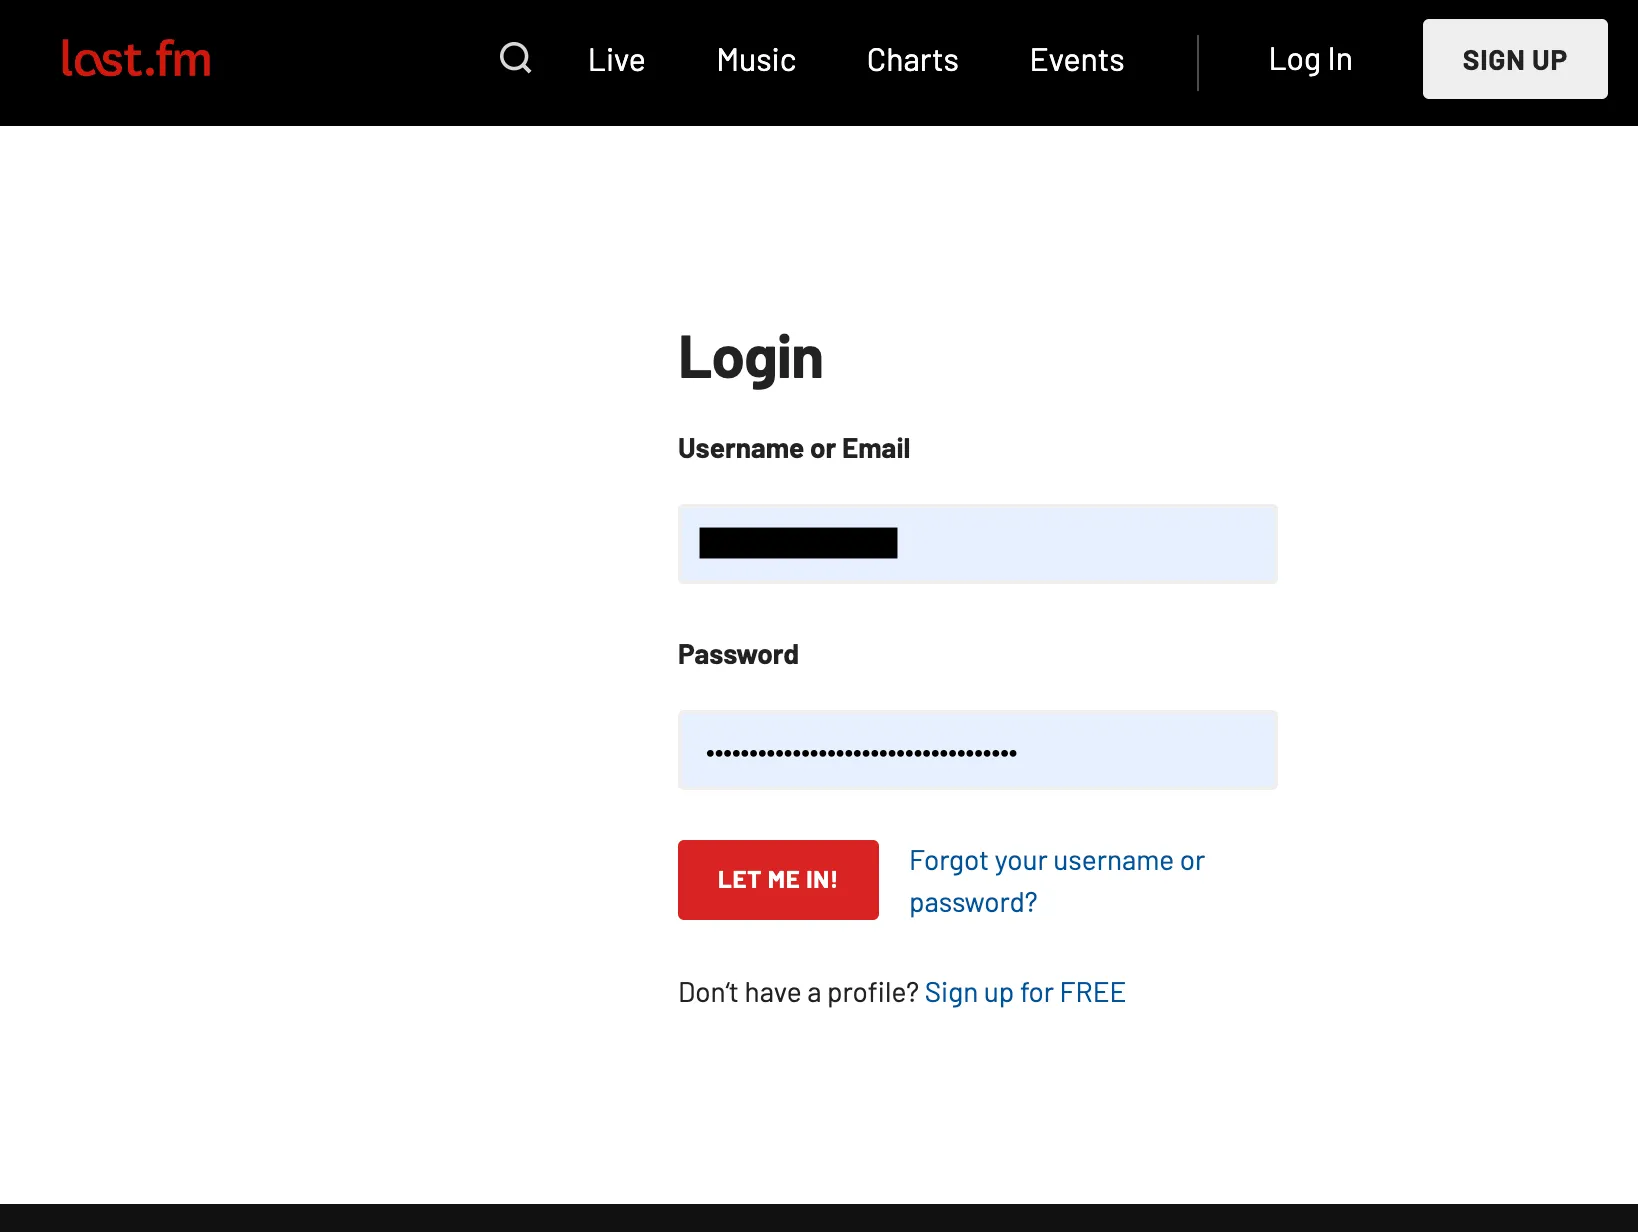
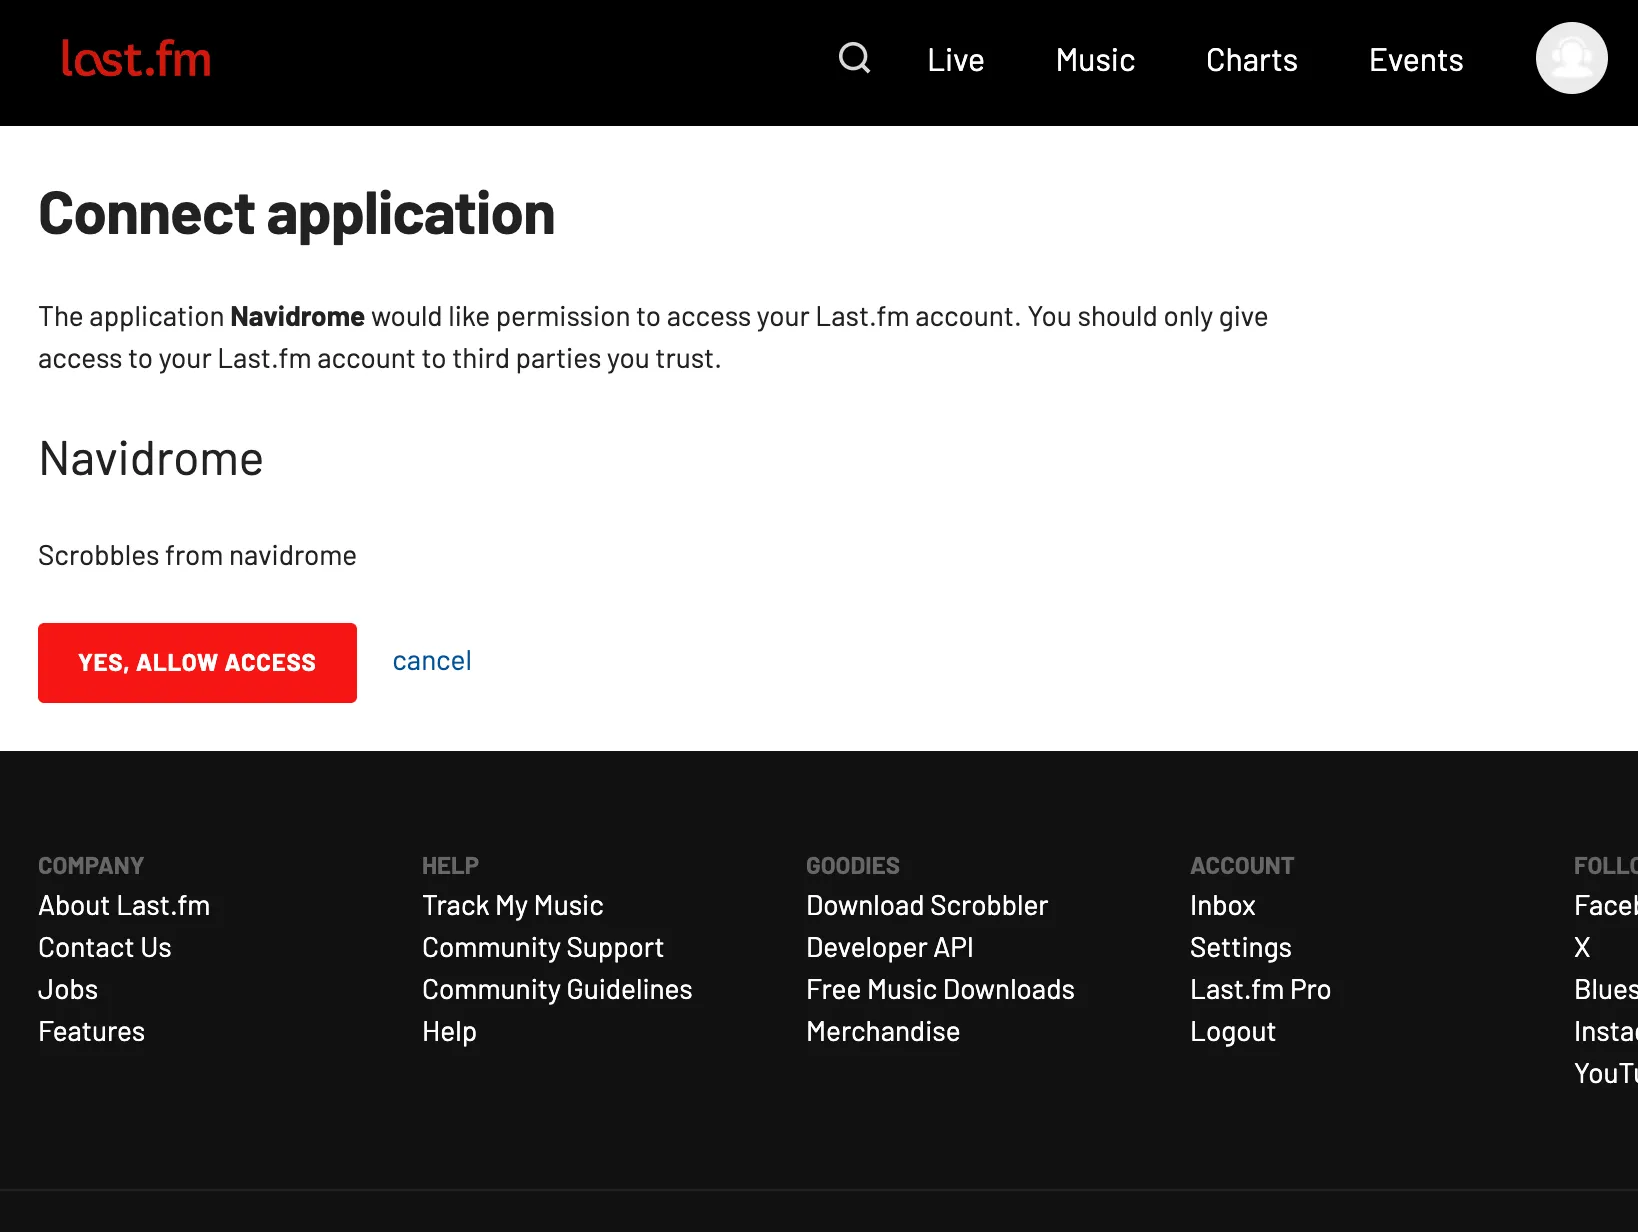
- Click “Yes, allow access”.
ListenBrainz
- Toggle the option
Scrobble to ListenBrainz. If you already have a User key generated, skip to step 4. - Click on the appropriate link in the pop-up that opens.
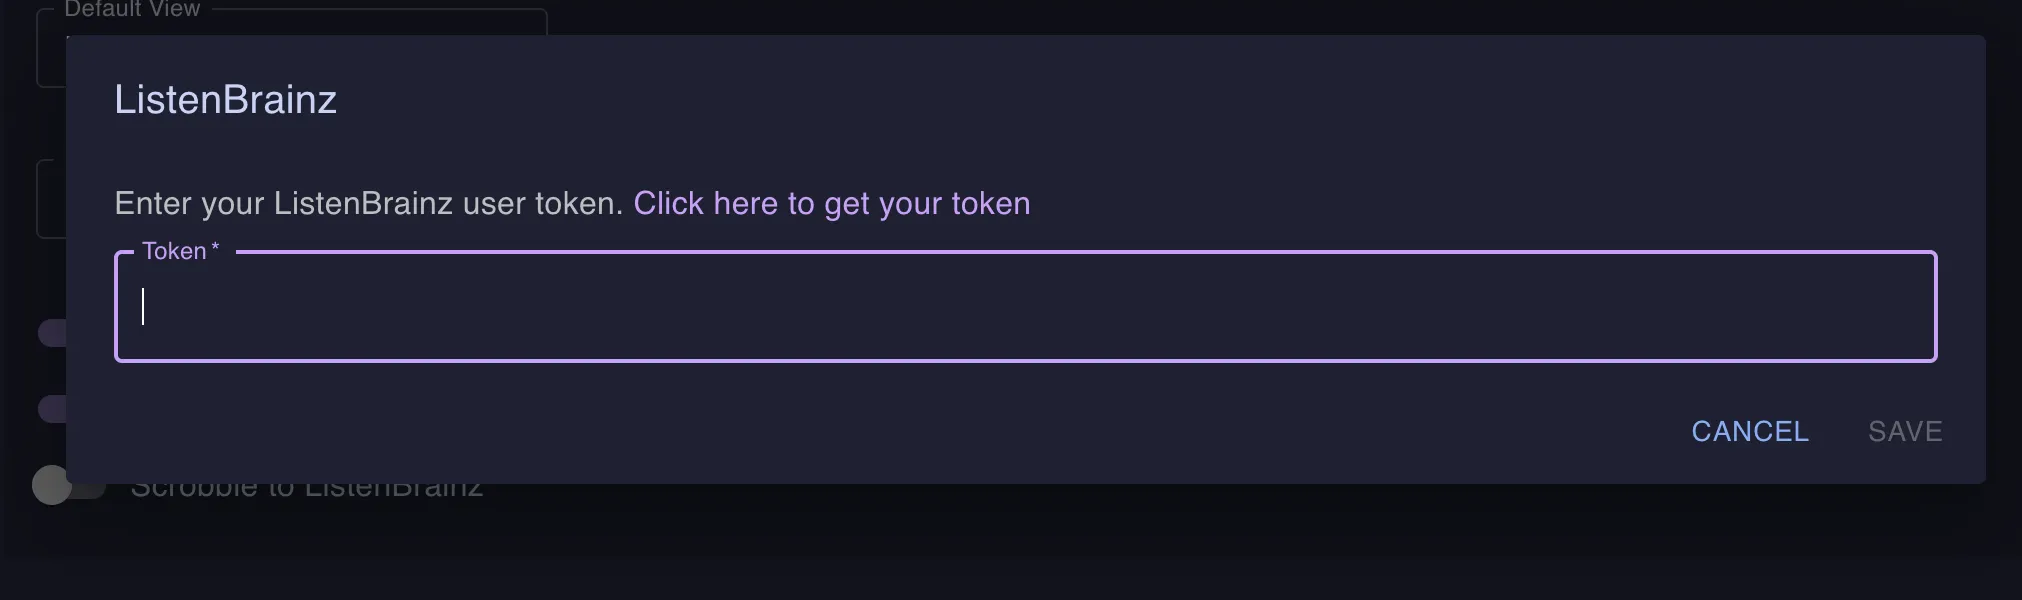
- On the ListenBrainz website, either generate a new token or copy your existing one, then go back to your Navidrome tab.

- Paste the token in the pop-up and save.
Scrobble History
Starting with version 0.59.0, Navidrome tracks your scrobble/listen history natively. This means that for music added after this version, Navidrome maintains a complete record of when each track was played. This historical data will be used in future features such as statistics and analytics (“Navidrome Wrapped” style reports).